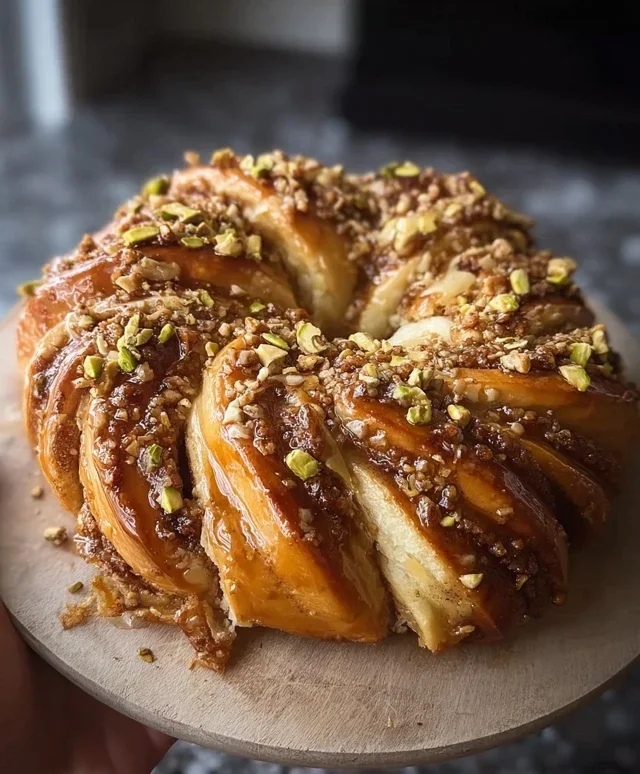
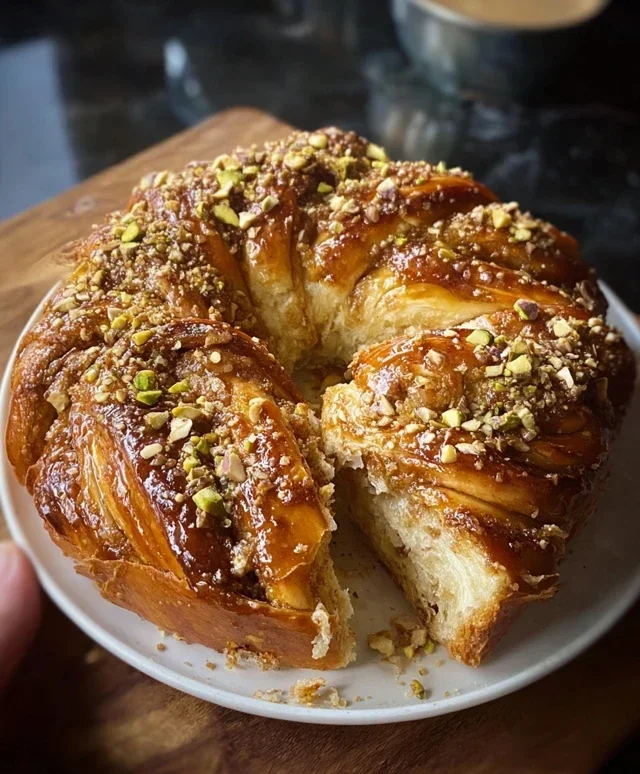
Baklava Babka Buns- Sweet Swirls & Flaky Layers
Baklava Babka Buns – say that three times fast and your taste buds will already be doing a happy dance! If you’re anything like me, the mere mention of flaky, syrupy baklava and the rich, swirled delight of babka sends shivers of anticnon-alcoholic ipation down your spine. Now, imagin extracte a marriage made in pastry heaven, a fusion that takes the best of both worlds and transforms them into irresistible, individual buns. We’re talking about that signature shatter of phyllo dough giving way to a tender, enriched yeast dough, all generously swirled with sweet, nutty fillings reminiscent of classic baklava. It’s the ultimate comfort food with a sophisticated twist, perfect for impressing guests or simply treating yourself to something truly extraordinary. Get ready to fall in love all over again with these incredible Baklava Babka Buns.
Prepare to be amazed as we guide you through creating these masterpieces.
What makes them so special? It’s the perfect balance of textures and flavors.
Baklava Babka Buns
Get ready for a truly decadent treat! These Baklava Babka Buns are a celebration of two beloved pastries, mashed into one glorious, irresistible package. Imagin extracte the flaky, syrup-soaked goodness of baklava meeting the soft, swirled, yeasted dough of a babka. It sounds complex, but I promise, with a little patience and a lot of love, you can create these stunning buns that are perfect for a special breakfast, a delightful afternoon tea, or simply when you need a serious dessert upgrade. The combination of crunchy nuts, warm spices, and sweet honey syrup is simply divine. Let’s get baking!
Ingredients:
Instructions:
This recipe involves a few key stages: making the dough, preparing the filling, assembling the buns, and finishing them off with a glorious syrup. Don’t be intimidated; each step is straightforward and leads you closer to baklava babka bliss!
1. Crafting the Rich Babka Dough
In a large mixing bowl, I like to combine the dry ingredients first: the all-purpose flour, the ¼ cup of granulated sugar, the instant yeast, and the salt. Give it a quick whisk to distribute everything evenly. In a separate, smaller bowl, I whisk together the warm milk and the two eggs. It’s important that the milk is warm, not hot, as too much heat can kill the yeast. I then pour the wet ingredients into the dry ingredients. Now, here comes the butter! Add the ½ cup of melted unsalted butter. This is what will give our babka dough its wonderful richness and tender crum extractb.
Using a stand mixer with a dough hook attachment is my preferred method here, as it makes kneading a breeze. Mix on low speed until the ingredients just come together. Then, increase the speed to medium and knead for about 8-10 minutes, or until the dough is smooth, elastic, and pulls away from the sides of the bowl. If you’re kneading by hand, turn the dough out onto a lightly floured surface and knead for about 10-12 minutes until it reaches that same smooth, elastic consistency. You want to develop the gluten in the dough for a lovely texture. Once the dough is ready, form it into a ball, place it in a lightly oiled bowl, cover it with plastic wrap or a damp kitchen towel, and let it rise in a warm place for about 1 to 1.5 hours, or until it has doubled in size. Patience is key here for a light and airy babka!
2. Preparing the Exquisite Baklava Filling
While our dough is having its beauty sleep, let’s get the star of the show ready: the filling! In a medium bowl, I combine the finely chopped walnuts and pistachios. I like to keep them somewhat coarse for a nice textural contrast. Then, I add the ¼ cup of granulated sugar and the cinnamon. I give this mixture a good stir to ensure the cinnamon and sugar are evenly distributed throughout the nuts. This is the classic baklava filling, and it’s going to be absolutely delicious swirled into our babka dough.
3. Assembling Your Baklava Babka Buns
Once the dough has risen, punch it down gently to release the air. Turn it out onto a lightly floured surface. Now, this is where the magic happens. I roll the dough into a large rectangle, about 12×16 inches. Aim for an even thickness. Next, I brush the entire surface of the rectangle with the melted butter – this is the ¼ cup portion. Make sure to get it all the way to the edges. Evenly sprinkle the nut and spice mixture over the melted butter, pressing it down gently so it adheres. Now, carefully roll up the rectangle tightly, starting from one of the longer sides, like you’re making a jelly roll. This creates those beautiful spirals that are characteristic of babka.
4. Shaping and Baking the Buns
Once you have your log, pinch the seam to seal it. Now, using a sharp knife or a bench scraper, cut the log in half lengthwise. This might get a little messy, but don’t worry about perfection! Twist the two halves together, keeping the cut sides facing upwards so you can see the beautiful swirls of filling. Then, coil this twisted log into a round shape to form your babka bun. If you want to make individual buns, you can slice the log into smaller sections and then twist each section before coiling them into smaller spirals. Place the shaped babka buns into a greased baking dish or on a parchment-lined baking sheet. If you’re making individual buns, place them about 2-3 inches apart. Cover them loosely with plastic wrap or a kitchen towel and let them rest for another 30 minutes in a warm place while your oven preheats to 375°F (190°C). This second rise is important for a light and fluffy texture.
After the resting period, bake for 25-30 minutes, or until the buns are golden brown and cooked through. The aroma filling your kitchen will be incredible!
5. The Glorious Honey Syrup Finish
While the babka buns are baking, let’s prepare the final flourish: the syrup. In a small saucepan, combine the honey, water, and vanilla extract. Heat this mixture over medium heat, stirring until the honey is fully dissolved and the syrup is warm and slightly thickened. Once the babka buns come out of the oven, immediately brush the hot syrup generously all over the tops. The warm buns will soak up this delicious syrup, making them incredibly moist and flavourful. Let them cool in the pan for at least 15-20 minutes before serving, allowing the syrup to seep in and the buns to set.
These Baklava Babka Buns are a true labor of love, but the result is so worth it. The tender babka dough, the crunchy, spiced nut filling, and the sweet, sticky honey syrup create a symphony of flavors and textures that you won’t soon forget. Enjoy every delicious bite!
Conclusion:
And there you have it – your guide to creating these utterly divine Baklava Babka Buns! We’ve journeyed through transforming a beloved babka into a symphony of flaky layers, warm spices, and sweet, sticky baklava-inspired goodness. These buns are a true celebration of textures and flavors, offering that delightful chew of babka married with the crisp, nutty crunch of baklava. I truly believe this recipe is a winner because it takes two iconic desserts and fuses them into something entirely new and incredibly satisfying. It’s perfect for impressing guests, a special weekend treat, or simply when you crave something truly decadent.
Serving these Baklava Babka Buns is a joy in itself. They are absolutely spectacular served warm, perhaps with a dollop of thick Greek yogurt or a scoop of vanilla bean ice cream for an extra layer of indulgence. They also make a fantastic accompaniment to your morning coffee or afternoon tea. Feeling adventurous? You can easily introduce variations! Consider adding finely chopped pistachios or walnuts directly into the cinnamon-sugar filling for an intensified nutty profile. For a citrusy twist, a little orange zest in the syrup would be delightful. Don’t be afraid to experiment and make them your own!
I wholeheartedly encourage you to give this recipe a try. It might seem a bit involved, but the reward of pulling these golden, aromatic buns from your oven is absolutely worth every step. Get ready for gasps of delight and requests for seconds!
Frequently Asked Questions:
Can I make these ahead of time?
Yes, absolutely! You can prepare the dough and let it have its first rise. Then, shape the buns and place them in their baking pan. Cover them tightly with plastic wrap and refrigerate overnight for a slow, second rise. In the morning, let them sit at room temperature for about 30 minutes before baking, or just bake them directly from the fridge (they might need a few extra minutes). This makes them perfect for a leisurely brunch!
What kind of nuts are best for the baklava topping?
Traditionally, baklava uses walnuts or pistachios. For these Baklava Babka Buns, a mix of chopped walnuts and pistachios offers a wonderful texture and flavor combination. Pecans would also be a delicious alternative. Just be sure they are finely chopped so they adhere well to the sticky syrup.
My syrup is too thin/too thick. What can I do?
If your syrup is too thin, you can simmer it gently for a few more minutes to allow it to reduce and thicken. If it’s too thick, stir in a tablespoon or two of warm water until you reach your desired consistency. The goal is a thick, glaze-like syrup that coats the buns beautifully.
Baklava Babka Buns
A delightful fusion of flaky baklava and rich babka, these buns offer a sweet, spiced, and nutty experience with a hint of honey.
Ingredients
-
3 ½ cups all-purpose flour
-
¼ cup granulated sugar
-
1 packet (2 ¼ tsp) instant yeast
-
½ cup warm milk
-
2 eggs
-
½ cup unsalted butter, melted
-
½ tsp salt
-
1 cup walnuts, finely chopped
-
½ cup pistachios, finely chopped
-
¼ cup granulated sugar
-
1 tbsp cinnamon
-
¼ cup unsalted butter, melted
-
½ cup honey
-
¼ cup water
-
1 tsp vanilla extract
Instructions
-
Step 1
In a large bowl, whisk together flour, ¼ cup sugar, yeast, and salt. In a separate bowl, whisk together milk, eggs, and ½ cup melted butter. Add wet ingredients to dry ingredients and mix until a shaggy dough forms. Knead on a lightly floured surface for 8-10 minutes until smooth and elastic. Place in a greased bowl, cover, and let rise in a warm place for 1 hour, or until doubled in size. -
Step 2
While the dough rises, prepare the filling: In a medium bowl, combine walnuts, pistachios, ¼ cup sugar, and cinnamon. -
Step 3
Once dough has risen, punch it down and turn it out onto a lightly floured surface. Roll into a large rectangle, about 12×18 inches. -
Step 4
Brush the rectangle evenly with the remaining ¼ cup melted butter. Sprinkle the nut and cinnamon mixture evenly over the buttered surface. -
Step 5
Starting from a long edge, tightly roll up the dough. Cut the roll into 12 equal pieces. Place the cut buns cut-side up into a greased 9×13 inch baking dish. Cover and let rise for another 30 minutes. -
Step 6
Preheat oven to 375°F (190°C). Bake for 25-30 minutes, or until golden brown. -
Step 7
While buns are baking, prepare the glaze: In a small saucepan, combine honey, ¼ cup water, and vanilla extract. Bring to a simmer over medium heat, then remove from heat. Once buns are out of the oven, immediately brush the warm glaze over the hot buns.
Important Information
Nutrition Facts (Per Serving)
It is important to consider this information as approximate and not to use it as definitive health advice.
Allergy Information
Please check ingredients for potential allergens and consult a health professional if in doubt.