Perfect Grilled Pizza – Easy Recipe Guide
How to Make the Perfect Grilled Pizza is a culinary quest many of us embark on, and for good reason! Imagin extracte this: a blistered, smoky crust, bubbling cheese, and your favorite toppings, all kissed by the open flame of your grill. There’s something undeniably magical about grilled pizza. It transforms a beloved comfort food into an outdoor dining experience, perfect for warm evenings with friends and family. What makes it so special? It’s the char that a grill imparts, a smoky depth and a delightful chegrape juicess you just can’t replicate in a conventional oven. This isn’t just pizza; it’s an adventure for your taste buds, a conversation starter, and a guaranteed crowd-pleaser. Get ready to elevate your pizza game because we’re diving deep into the secrets of crafting the absolute perfect grilled pizza.
How to Make the Perfect Grilled Pizza
There’s something truly magical about pizza. Whether it’s a casual weeknight dinner or a centerpiece for a backyard gathering, pizza always brings smiles. But have you ever experienced the smoky char and irresistible crispiness of a pizza made on the grill? It’s a game-changer! Forget soggy crusts or burnt bottoms; this method, when done right, delivers a pizza that’s both rustic and refined, with a flavor profile you just can’t achieve in a conventional oven. It’s surprisingly simple, and the results are so impressive, you’ll be ditching your pizza stone for good. Let’s get grilling!
Ingredients:
Preparing Your Workspace and Dough
Before we even think about lighting the grill, it’s crucial to have everything prepped and ready. This is a fast cooking process, so you won’t have time to be scrambling for ingredients. First, take your pizza dough out of the refrigerator at least 30-60 minutes before you plan to grill. This allows it to come to room temperature, making it much more pliable and easier to stretch without tearing. If you’re using store-bought dough, giving it a little time to relax will make a huge difference.
Next, set up your “assembly line.” You’ll want your sauce, cheeses, and toppings all within easy reach. Lightly oil a large cutting board or a baking sheet where you’ll be assembling your pizza. Dusting this surface lightly with cornmeal or semolina flour will help prevent the dough from sticking, both during assembly and when you transfer it to the grill. This is a simple but vital step that will save you a lot of frustration.
Grill Setup for Success
The key to a perfect grilled pizza is managin extractg your grill temperature effectively. You want a medium-high heat, typically around 400-450°F (200-230°C). If you’re using a charcoal grill, get your coals going until they are covered in a light gray ash. You’ll want to create two heat zones: a direct heat zone (coals directly underneath) and an indirect heat zone (where there are no coals). This allows for greater control. For a gas grill, simply preheat all burners to medium-high, then turn off or lower one side to create your indirect zone.
Before you put any dough on the grill, make sure your grates are clean and well-oiled. Use a grill brush to scrape off any residue, and then generously brush the grates with a high-heat oil like canola or vegetable oil. This will prevent the delicate pizza dough from sticking and tearing when you try to flip it. A well-oiled grill is your best friend for grilled pizza.
The Grilling Process: Step-by-Step
1. Grilling the First Side of the Dough: Lightly flour your work surface and gently stretch your pizza dough into your desired shape and thickness. Aim for roughly a 12-14 inch circle or rectangle. Be careful not to overwork the dough; if it springs back, let it rest for a few minutes. Once stretched, carefully transfer the dough to a piece of parchment paper that has been lightly dusted with cornmeal or semolina. This parchment paper is a secret weapon for easy transfer. Carefully lift the parchment paper with the dough on it and place it directly onto the preheated grill grates over the direct heat zone. Grill for 2-3 minutes, or until the underside is golden brown and has grill marks. You’ll be able to see the dough puffing up.
2. Flipping and Topping the Dough: Using a large spatula or tongs, carefully flip the dough over. If you used parchment paper, you can carefully slide it out from under the dough once it’s flipped. Now, brush the grilled side of the dough with a light layer of olive oil. This adds flavor and helps the sauce adhere. Quickly spread your pizza sauce over the grilled dough, leaving a small border for the crust. Don’t over-sauce, as too much moisture can make the crust soggy.
3. Adding Cheese and Toppings: Sprinkle an even layer of mozzarella cheese over the sauce, followed by the grated Parmesan cheese. Now is the time to add your chosen toppings. Distribute them evenly across the cheese. Avoid overloading the pizza with too many toppings, as this can also lead to uneven cooking and a soggy crust. Remember, the grill cooks fast!
4. Finishing the Cook: Once your pizza is topped, carefully move it to the indirect heat zone of your grill. Close the lid and cook for another 5-8 minutes, or until the cheese is melted and bubbly and the crust is golden brown and cooked through. Keep an eye on it; cooking times can vary depending on your grill’s temperature and thickness of your crust. You want that beautiful char on the edges and a fully cooked base.
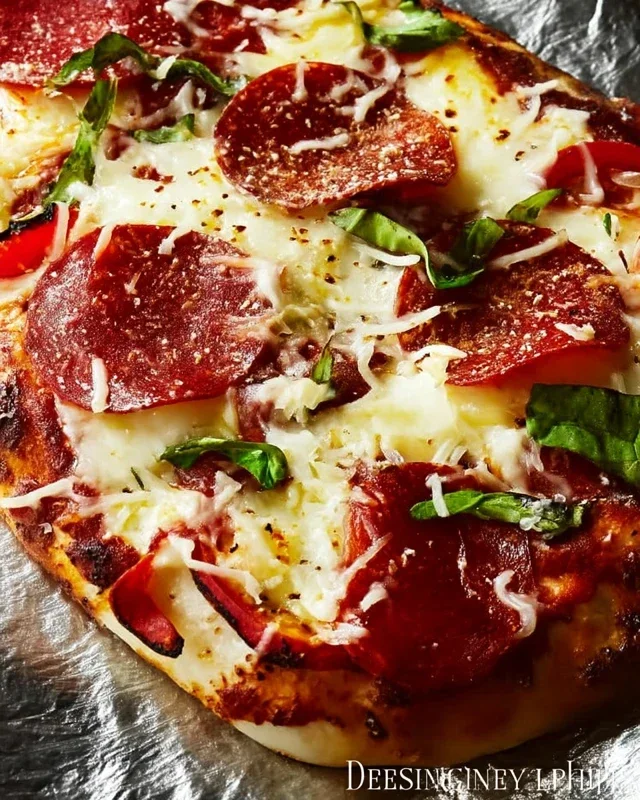
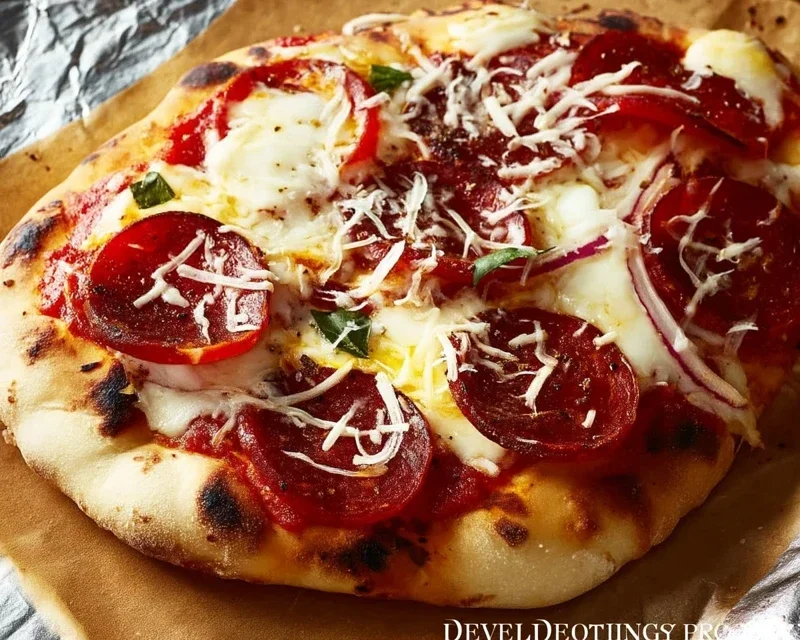
5. Resting and Serving: Once your grilled pizza is ready, carefully remove it from the grill using a large spatula and transfer it to a cutting board. Let it rest for just a minute or two before slicing. This allows the cheese to settle and prevents toppings from sliding off. Garnish with fresh basil leaves if desired. Slice with a sharp pizza cutter and enjoy the incredible flavor of your perfectly grilled pizza! The smoky notes from the grill, combined with the crispy crust and fresh toppings, are truly unparalleled.
Making pizza on the grill is a fun and rewarding experience. With a little practice, you’ll be creating pizzeria-quality pies in your own backyard. Don’t be afraid to experiment with different toppings and sauces – the possibilities are endless! Happy grilling!
Conclusion:
You’ve now got the blueprint for crafting the absolutely perfect grilled pizza! The beauty of this method lies in its simplicity and the incredible flavor infusion that only grilling can provide. The high heat creates a wonderfully crisp, slightly charred crust, while your toppings cook quickly and evenly. It’s a fantastic way to elevate your pizza game and impress friends and family without spending hours in the kitchen. Imagin extracte a warm summer evening, the smoky aroma filling the air, and a delicious, custom-made pizza hot off the grill – pure bliss!
Don’t hesitate to get creative with your toppings! Classic Margherita with fresh mozzarella, basil, and tomatoes is always a winner. For something heartier, try a BBQ chicken pizza with red onion and cilantro. Vegetarians will love a medley of roasted vegetables like bell peppers, zucchini, and mushrooms. And for a sweet finish, a dessert pizza with mascarpone, berries, and a drizzle of honey is divine. The key is to experiment and discover your own perfect grilled pizza combinations.
So, gather your ingredients, fire up that grill, and embark on this delicious culinary adventure. I encourage you to try this recipe; I promise you won’t be disappointed. The results are so rewarding, and the process is incredibly fun. Happy grilling!
Frequently Asked Questions:
Can I make the pizza dough ahead of time?
Absolutely! You can prepare your pizza dough a day or two in advance and store it in the refrigerator. Just let it come to room temperature for about 30-60 minutes before you plan to grill it for easier handling.
What if I don’t have a grill? Can I still achieve a similar result?
While grilling provides a unique smoky flavor and char, you can get close on a very hot oven-baked pizza. Use a pizza stone or steel preheated in your oven at its highest setting (usually 500-550°F or 260-290°C). Slide the pizza onto the hot surface and bake until the crust is golden and the cheese is bubbly.
How do I prevent the dough from sticking to the grill grates?
This is a common concern, but easily preventable! Ensure your grill grates are very clean and well-oiled. A good trick is to lightly brush the cooked side of the dough with olive oil before flipping it. Also, avoid moving the pizza too much in the first few minutes after placing it on the grill to allow it to set.
The Perfect Grilled Pizza
Achieve a delicious, crispy crust with a smoky flavor using this simple grilled pizza recipe.
Ingredients
-
1 pound pizza dough
-
1/2 cup tomato sauce
-
1 cup shredded mozzarella cheese
-
1/4 cup sliced pepperoni
-
2 tablespoons olive oil
-
Pinch of salt
-
Pinch of black pepper
Instructions
-
Step 1
Preheat your grill to medium-high heat (around 450-500°F). Brush one side of the pizza dough with olive oil. -
Step 2
Carefully place the oiled side of the dough directly onto the grill grates. Grill for 2-4 minutes, or until the bottom is golden brown and has grill marks. Flip the dough over. -
Step 3
Quickly spread the tomato sauce over the grilled side of the dough, leaving a small border for the crust. -
Step 4
Sprinkle the mozzarella cheese evenly over the sauce, then top with the pepperoni slices. -
Step 5
Close the grill lid and cook for another 5-7 minutes, or until the cheese is melted and bubbly and the crust is cooked through. Rotate the pizza if needed for even cooking. -
Step 6
Remove the pizza from the grill, sprinkle with salt and pepper, slice, and serve immediately.
Important Information
Nutrition Facts (Per Serving)
It is important to consider this information as approximate and not to use it as definitive health advice.
Allergy Information
Please check ingredients for potential allergens and consult a health professional if in doubt.