Peaches and Cream Pie- Easy Summer Dessert
Peaches and Cream Pie is the quintessential summer dessert, a creamy, dreamy creation that captures the very essence of sun-ripened sweetness. Imagin extracte biting into a flaky, buttery crust, only to be met with a velvety smooth filling bursting with tender, juicy peaches. It’s no wonder this classic dish holds such a special place in so many hearts. The beauty of Peaches and Cream Pie lies in its delightful simplicity, allowing the natural flavors of the fruit to shine. We love it because it’s a perfect balance – the slight tartness of the peaches cuts through the rich, luscious cream, creating a symphony of textures and tastes that’s utterly irresistible. This isn’t just any pie; it’s a nostalgic trip back to carefree summer days, a taste of pure, unadulterated joy that everyone can appreciate. Get ready to fall in love with this Peaches and Cream Pie all over again.
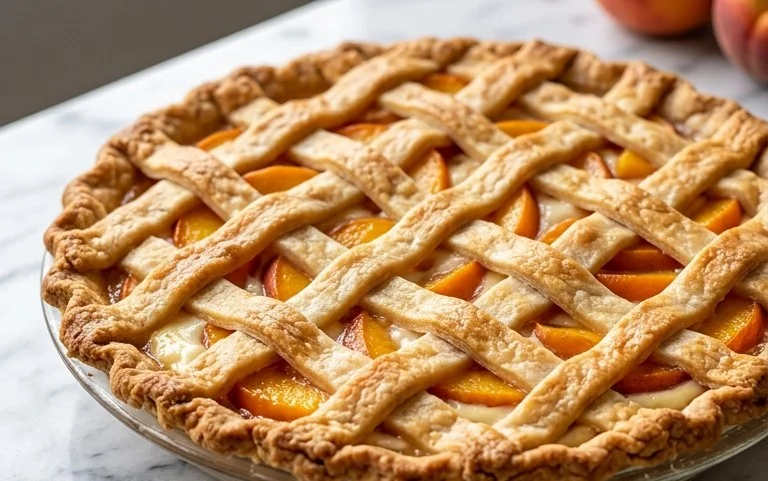
Peaches and Cream Pie
There’s something undeniably comforting and delightful about a Peaches and Cream Pie. It’s a dessert that evokes sunshine, warm summer days, and the simple joy of good food. This recipe is a treasure, combining a tender, cake-like bottom layer with a luscious layer of sweet peaches, all topped with a tangy, creamy cheese mixture. It’s surprisingly easy to put together, making it perfect for a casual gathering or a special occasion. Let’s dive into creating this absolute delight!
Ingredients:
Preparation and Baking Instructions:
Creating this Peaches and Cream Pie involves three distinct layers, each contributing to the overall symphony of flavors and textures. We’ll start by preparing the base, then layering the peaches, and finally, crafting the creamy topping.
Step 1: Preparing the Luscious Peach Layer
The first step in our pie-making journey is to prepare the star of the show: the peaches. If you’re using canned sliced peaches, carefully drain them, ensuring you reserve that sweet, fragrant juice. This juice is a precious ingredient that will be used later to add a wonderful flavor dimension to our cream cheese topping. If you’re opting for fresh peaches, now is the time to peel, pit, and slice them. Aim for consistent thickness so they cook evenly. You’ll want about 2 1/4 cups of cubed or 3 cups of sliced fresh peaches to replicate the amount in one standard can. Set your prepared peaches aside; they’ll be ready to go when we assemble the pie.
Step 2: Creating the Tender Cake-Like Base
Now, let’s focus on the foundation of our pie. In a medium mixing bowl, whisk together the all-purpose flour, salt, and baking powder. This dry mixture forms the structure of our base. Next, add the non-instant vanilla pudding mix. It’s crucial that you use the “cook and serve” type of pudding mix, not the instant kind, as this is what will create that delightful, slightly cakey texture. Stir these dry ingredients together thoroughly to ensure everything is evenly distributed. In a separate bowl, cream together the softened butter and the egg until light and fluffy. Gradually add the milk to this wet mixture, beating until well combined. Now, it’s time to bring the wet and dry ingredients together. Add the dry ingredients to the wet ingredients and mix just until barely combined. Be careful not to overmix, as this can lead to a tough base. The batter will be thick.
Step 3: Assembling the Pie Layers
This is where the magic starts to happen visually. Take a 9-inch pie plate or a similarly sized baking dish. Pour the batter for the cake-like base into the ungreased pie plate. Gently spread it evenly across the bottom. Don’t worry if it doesn’t reach the edges perfectly; it will spread as it bakes. The next step is to artfully arrange your prepared peach slices (or peach cubes) over the batter. Try to create an even layer, covering as much of the batter as possible. The peaches will soften and meld beautifully with the base as they bake.
Step 4: Crafting the Creamy Cream Cheese Topping
While our pie base and peaches are waiting to go into the oven, let’s prepare the irresistible cream cheese topping. In another mixing bowl, combine the softened cream cheese and granulated sugar. Beat these together with an electric mixer on medium speed until the mixture is smooth and creamy, with no lumps of cream cheese remaining. This is essential for a silky texture. Now, gradually add the reserved peach juice, 1 tablespoon at a time, beating well after each addition. This will lighten the cream cheese mixture and infuse it with that wonderful peach flavor. The consistency should be like a thick, smooth frosting. Once combined, spoon this glorious cream cheese mixture evenly over the layer of peaches. Spread it gently to cover the peaches, creating a beautiful white layer that will turn slightly golden and delicious as it bakes.
Step 5: Baking and Cooling to Perfection
Preheat your oven to 350°F (175°C). Place the assembled pie into the preheated oven. Bake for approximately 35 to 45 minutes, or until the topping is lightly golden brown and the edges of the cake-like base are set and starting to pull away slightly from the sides of the pie plate. You can insert a toothpick into the cake layer to check for doneness; it should come out clean. Once baked, carefully remove the pie from the oven and let it cool on a wire rack. This cooling period is crucial. It allows the pie to set properly and the flavors to meld. For the best texture and flavor, allow the pie to cool completely, which can take at least 2-3 hours. You can then slice and serve. If you desire, a light dusting of cinnamon or a few extra fresh peach slices can be added as a garnish before serving. Enjoy every delightful bite of your homemade Peaches and Cream Pie!

Conclusion:
And there you have it – our delightful Peaches and Cream Pie recipe, a true celebration of summer’s bounty! This pie is truly a star because it strikes the perfect balance between sweet, juicy peaches and a luxuriously creamy filling, all nestled within a flaky, golden crust. It’s a comforting classic that’s surprisingly easy to whip up, making it perfect for both novice bakers and seasoned pros looking for a showstopper dessert. Whether you’re hosting a backyard barbecue, a special family gathering, or simply craving a sweet treat, this pie is sure to impress.
For serving suggestions, a dollop of freshly whipped cream is non-negotiable, but consider a scoop of vanilla bean ice cream for an extra decadent experience. A light dusting of cinnamon on top adds a warm, inviting aroma. If you’re feeling adventurous, try variations like adding a hint of almond extract to the cream filling or a crum extractble topping made with oats and brown sugar for added texture. Don’t hesitate to experiment and make this Peaches and Cream Pie your own!
Frequently Asked Questions:
Can I use canned peaches instead of fresh?
Yes, you can! If using canned peaches, drain them very well and pat them dry to avoid a watery filling. You might need to adjust the sugar slightly depending on the sweetness of the canned peaches.
What kind of crust works best?
A classic buttery pie crust is ideal for this recipe, providing a delicious foundation. However, a grabeef ham cracker crust or even a gin extractgersnap crust can offer interesting flavor twists.
How should I store leftover pie?
Store any leftover Peaches and Cream Pie in an airtight container in the refrigerator for up to 3-4 days. It’s best enjoyed chilled, but you can also serve it at room temperature.
Peaches and Cream Pie
A delightful layered pie featuring a flaky crust, sweet peaches, and a creamy cheesecake topping.
Ingredients
-
3/4 cup all purpose flour
-
1/2 teaspoon salt
-
1 teaspoon baking powder
-
1 (3 ounce) package non-instant vanilla pudding mix
-
3 Tablespoons butter, softened
-
1 egg
-
1/2 cup milk
-
1 (28 ounce) can sliced peaches, drained (juice reserved)
-
1 (8 ounce) package cream cheese, softened
-
1/2 cup granulated sugar
-
3 Tablespoons reserved peach juice
Instructions
-
Step 1
Preheat oven to 375°F (190°C). In a medium bowl, whisk together flour, salt, and baking powder. Stir in the vanilla pudding mix. -
Step 2
Cut in the softened butter until the mixture resembles coarse crumbs. In a small bowl, whisk together the egg and milk. Add the wet ingredients to the dry ingredients and mix until just combined to form the crust. -
Step 3
Press the crust mixture evenly into the bottom and up the sides of an ungreased 9-inch pie plate. Bake for 10-12 minutes, or until lightly golden brown. Let cool completely. -
Step 4
In a separate bowl, beat the softened cream cheese and granulated sugar until smooth. Stir in the reserved peach juice until well combined. -
Step 5
Spread the cream cheese mixture evenly over the cooled crust. Arrange the drained sliced peaches on top of the cream cheese layer. -
Step 6
Refrigerate the pie for at least 4 hours, or until firm, before serving. Slice and enjoy!
Important Information
Nutrition Facts (Per Serving)
It is important to consider this information as approximate and not to use it as definitive health advice.
Allergy Information
Please check ingredients for potential allergens and consult a health professional if in doubt.