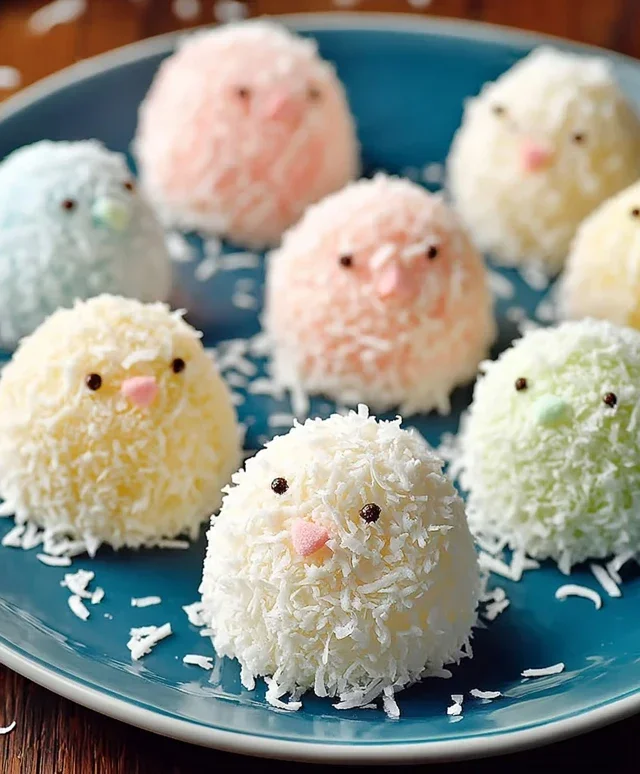
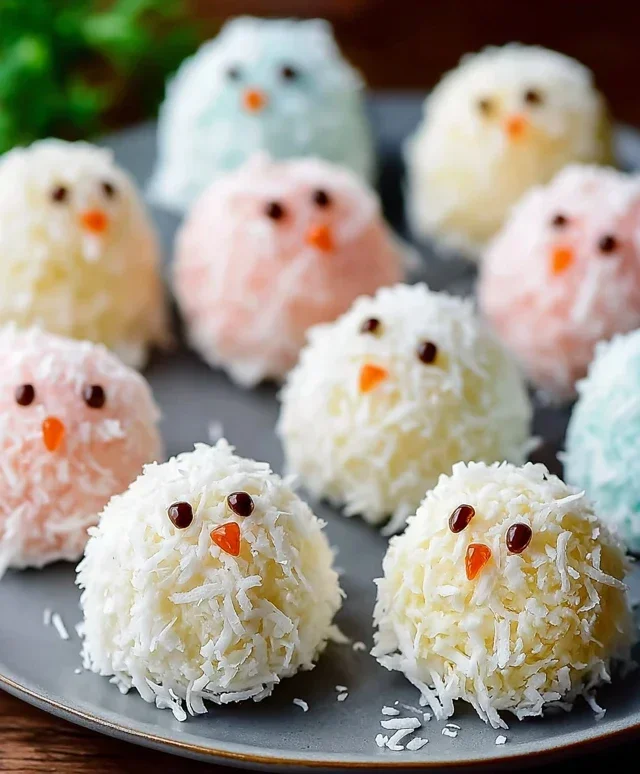
Easter Bunny Coconut Tails-Sweet & Easy Treat
Easter Bunny Coconut Tails are the whimsical, melt-in-your-mouth treats that truly capture the spirit of spring and all things delightful! If you’re looking for a way to add a touch of handmade magic to your Easter celebrations, look no further. These adorable little confections are incredibly popular because they’re not only visually charming, resembling fluffy bunny tails, but also wonderfully delicious. Imagin extracte a sweet, tender interior bursting with the tropical flavor of coconut, all coated in a delicate shell that offers a satisfying, subtle crunch. What makes these Easter Bunny Coconut Tails truly special is their simplicity. They’re surprisingly easy to whip up, making them perfect for involving little hands in the kitchen, and the joy on faces when they discover these charming delights is absolutely priceless. Get ready to hop into some serious baking fun!
Easter Bunny Coconut Tails
These adorable Easter Bunny Coconut Tails are a delightful and surprisingly simple treat to make for your Easter celebrations! They’re fluffy, sweet, and have that wonderful coconut flavor that’s perfect for spring. Kids and adults alike will be charmed by these whimsical bunny tails. They’re a fantastic alternative to dyeing eggs and offer a fun, edible craft experience. Imagin extracte a basket filled with these fluffy white delights – pure Easter magic! Let’s get started on creating these sweet little wonders.
Ingredients:
Crafting the Coconut Tails
The foundation of our Easter Bunny Coconut Tails is a sweet, no-bake coconut mixture. This part is super easy and comes together quickly, making it perfect for a last-minute Easter project.
1. Melting the Base: In a medium saucepan, combine the mini marshmallows and the butter. Place the saucepan over low heat. Stir constantly until the marshmallows and butter have completely melted into a smooth, gooey mixture. It’s important to use low heat to prevent the marshmallows from scorching or becoming tough. Keep stirring gently, ensuring no sticky bits are left at the bottom of the pan. This melted marshmallow mixture will act as the binder for our coconut, creating those wonderfully soft and chewy tails. The butter adds a richness that complements the sweetness of the marshmallows beautifully.
2. Incorporating the Coconut and Flavor: Once the marshmallow and butter mixture is smooth and fully melted, remove the saucepan from the heat. Immediately stir in the shredded coconut and the vanilla extract. Mix everything thoroughly until the shredded coconut is completely coated in the marshmallow mixture. The vanilla extract adds a lovely fragrance and a subtle depth of flavor that really elevates the coconut. You want to work quickly here, as the marshmallow mixture can start to set up as it cools. Make sure every strand of coconut is embraced by the gooey goodness. The texture at this stage will be quite sticky and clumpy – that’s exactly what we want!
3. Shaping the Tails: Allow the coconut mixture to cool slightly for about 5-10 minutes. It should still be warm enough to be pliable, but not so hot that it’s uncomfortable to handle. Lightly grease your hands with a little butter or cooking spray to prevent sticking, or you can use a small cookie scoop. Take about 1 to 2 tablespoons of the coconut mixture at a time and roll it into a ball or an oval shape, resembling a fluffy bunny tail. Place the shaped tails onto a baking sheet lined with parchment paper or wax paper. Try to make them all roughly the same size for a uniform appearance. This is a great step to involve the kids! They can have so much fun rolling and shaping these little puffs of coconut. If the mixture becomes too difficult to handle, you can gently warm it up again over very low heat for a minute or two.
Adding the Bunny Touch
Now it’s time to add the finishing touches that truly transform these coconut balls into adorable bunny tails. This is where the white chocolate and candy melts come into play.
4. Dipping and Coating: Melt the white chocolate chips. You can do this by placing them in a microwave-safe bowl and microwaving in 30-second intervals, stirring in between, until smooth. Alternatively, you can use a double boiler. Once melted, dip about half of each coconut tail into the melted white chocolate. Let any excess chocolate drip back into the bowl. Place the dipped tails back onto the parchment-lined baking sheet. The white chocolate acts as a sweet shell and gives them a more polished look. You want a nice, even coating. Some people prefer to dip the entire tail, while others prefer just the bottom half for a more rustic look. Either way, it’s delicious!
5. Decorating the Fluff: Now for the fun part – decorating! Melt the pink candy melts according to package directions (again, you can use the microwave or a double boiler). Using a spoon or a piping bag with a small round tip, create a small, delicate pink dot or a tiny heart shape on the un-dipped side of each coconut tail. This little pink detail is what makes them look like the fluffy undersides of a bunny’s tail. Be sure to work relatively quickly with the candy melts, as they set up fast. You can also add a tiny dab of pink to the very tip of the white chocolate-dipped side if you like, mimicking a little shadow. Once decorated, let the tails sit at room temperature until the white chocolate and candy melts have completely set. This usually takes about 30-60 minutes. For quicker setting, you can pop them into the refrigerator for about 10-15 minutes, but be careful not to let them get too cold, as this can sometimes cause the chocolate to bloom.
These Easter Bunny Coconut Tails are a truly charming addition to any Easter gathering. They’re sweet, fluffy, and bursting with coconut flavor. Enjoy!
Conclusion:
I hope you’re as excited as I am to whip up these delightful Easter Bunny Coconut Tails! This recipe is truly a winner because it’s surprisingly simple to make, resulting in adorable, bite-sized treats that are bursting with tropical coconut flavor. They’re perfect for decorating your Easter dessert table, filling Easter baskets, or even just enjoying as a sweet pick-me-up any time of year. The combination of moist shredded coconut and a touch of sweetness is utterly irresistible.
For serving, these bunny tails are fantastic on their own, but you can elevate them even further by arrangin extractg them on a platter with fresh berries or a dollop of whipped cream. They also make a charming addition to a larger Easter cake or cupcake display.
Don’t be afraid to experiment with variations! You can add a pinch of cardamom for warmth, or a tiny bit of lemon zest for a brighter flavor profile. For a richer treat, dip them halfway in melted white or dark chocolate before the coconut dries. The possibilities are truly endless, making this a versatile Easter treat. I strongly encourage you to give these Easter Bunny Coconut Tails a try – I promise you won’t be disappointed!
Frequently Asked Questions:
Q: Can I make these Easter Bunny Coconut Tails ahead of time?
Yes, absolutely! These treats can be made up to 2-3 days in advance. Store them in an airtight container at room temperature. They tend to be at their best when enjoyed within a couple of days of preparation.
Q: My coconut isn’t sticking well to the condensed milk mixture. What can I do?
Ensure your condensed milk mixture is not too dry. If it seems a little crum extractbly, you can gently warm it for a few seconds in the microwave or add another tablespoon of condensed milk. Also, make sure you’re pressing the coconut firmly onto the shaped tails to help it adhere.
Easter Bunny Coconut Tails
Sweet and fluffy coconut tails dipped in white chocolate, perfect for Easter.
Ingredients
-
2 cups shredded coconut
-
1½ cups mini marshmallows
-
¼ cup butter
-
1 teaspoon vanilla extract
-
1 cup white chocolate chips
-
Pink candy melts for decoration
Instructions
-
Step 1
In a microwave-safe bowl, combine shredded coconut, mini marshmallows, and butter. Microwave on high for 1 minute, stir, and microwave for another 30 seconds or until marshmallows are melted and smooth. -
Step 2
Stir in the vanilla extract until well combined. -
Step 3
Allow the mixture to cool slightly, then shape into carrot-like tails. Place on a parchment-lined baking sheet. -
Step 4
Melt the white chocolate chips according to package directions. Dip each coconut tail halfway into the melted white chocolate. Return to the parchment-lined baking sheet. -
Step 5
Melt the pink candy melts. Use a toothpick or piping bag to drizzle pink candy melt onto the white chocolate-dipped portion of the tails for decoration, resembling bunny tail fluff. -
Step 6
Let the tails set completely before serving.
Important Information
Nutrition Facts (Per Serving)
It is important to consider this information as approximate and not to use it as definitive health advice.
Allergy Information
Please check ingredients for potential allergens and consult a health professional if in doubt.