Buster Bar Ice Cream Dessert-Easy Copycat Recipe
Buster Bar Ice Cream Dessert is a truly iconic treat, and for good reason! It’s the kind of nostalgic dessert that instantly transports you back to carefree summer days. Who doesn’t remember that distinct, almost magical combination of textures and flavors? It’s that perfect balance of creamy ice cream, a rich chocolatey shell, and a delightful peanut crunch that makes this Buster Bar Ice Cream Dessert so incredibly beloved. This isn’t just any ice cream; it’s an experience. The way the cold ice cream contrasts with the slightly firm, melt-in-your-mouth chocolate coating, all punctuated by the satisfying chew and subtle nuttiness of the peanuts, is simply irresistible. It’s a symphony of sensations that leaves you craving another bite. Get ready to recreate this beloved classic in your own kitchen!
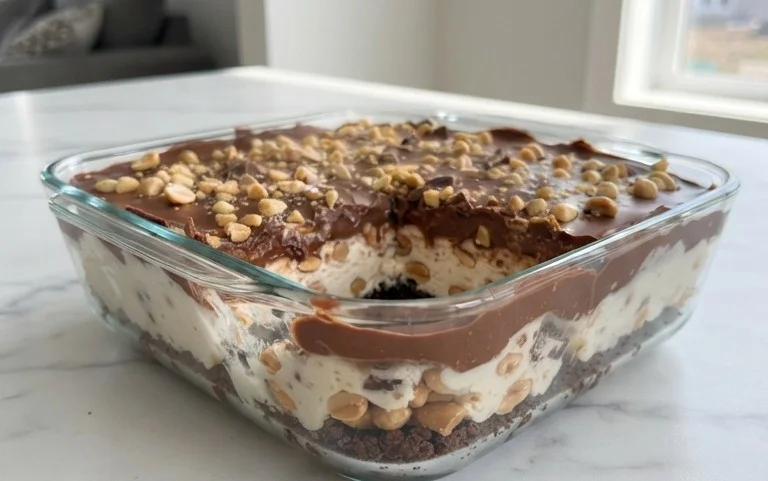
Buster Bar Ice Cream Dessert
Get ready to create a truly decadent and ridiculously easy dessert that tastes remarkably like those beloved frozen treats you know and love – the Buster Bar! This homemade version captures all the crunchy, chocolatey, peanutty goodness without any of the fuss. Perfect for a summer party, a weeknight treat, or just because you deserve something special, this Buster Bar Ice Cream Dessert is a guaranteed crowd-pleaser. Let’s dive into the magic!
Ingredients:
Crafting the Cookie Crust
The foundation of our Buster Bar is a crunchy, chocolatey crust, and it’s incredibly simple to make. We’ll start by taking that entire package of Oreo cookies and giving them a good crushing. You can do this by hand in a zip-top bag with a rolling pin, or for a quicker method, a food processor works wonders. We want fine crum extractbs, not big chunks. Once your Oreos are pulverized into dusty perfection, pour them into a medium-sized bowl. Now, add that half cup of melted butter to the cookie crum extractbs. Stir everything together thoroughly until the crum extractbs are evenly moistened and start to clump together. This mixture is going to form our base.
Take a 9×13 inch baking pan. You can line it with parchment paper for easier removal later, or simply grease it lightly. Pour the moistened Oreo crum extractb mixture into the prepared pan. Using the bottom of a glass or your hands, press the crum extractbs down firmly and evenly across the entire bottom of the pan. This will create a solid, cohesive layer that holds up well to the ice cream. Pop this pan into the freezer for at least 15-20 minutes while we prepare the next layer. This chilling step is crucial to ensure the crust stays firm and doesn’t get mixed into the ice cream.
Layering the Vanilla Bliss
Now for the star of the show: the ice cream! We need our half gallon of vanilla ice cream to be softened, not completely melted, but soft enough to spread easily. If you’ve just taken it out of the freezer, let it sit on the counter for about 10-15 minutes, or pop it in the microwave for very short, 15-second bursts, checking frequently. You want it pliable. Once it’s softened to the perfect spreading consistency, take the chilled Oreo crust out of the freezer. Dollop spoonfuls of the softened vanilla ice cream evenly over the crust. Then, using a spatula or the back of a spoon, gently spread the ice cream in an even layer, covering the entire surface of the cookie crust. Try to make it as smooth and even as possible for the best visual appeal and even distribution of toppings later.
The Peanutty Crunch
With our ice cream layer smoothed out, it’s time to introduce the satisfying crunch of peanuts. We’re using a full pound of Spanish peanuts here, which offer a wonderfully sweet and slightly nutty flavor that pairs perfectly with the chocolate and vanilla. You can use them whole, or if you prefer smaller pieces, you can give them a rough chop. Generously sprinkle the Spanish peanuts all over the top of the softened vanilla ice cream layer. Don’t be shy – the more peanuts, the more authentic the Buster Bar experience! Press them down very gently into the ice cream so they adhere and don’t all fall off when you cut and serve it. This creates that signature textural contrast. Once the peanuts are in place, return the entire pan back to the freezer. We want this to freeze solid. Give it at least 2-3 hours, but overnight is even better to ensure it’s completely firm and ready for the final touches.
Whipping Up the Chocolatey Magic
While our ice cream base is hardening in the freezer, we’ll prepare the irresistible chocolatey topping. This is where the magic truly happens! In a medium saucepan, combine the 12 ounces of semi-sweet chocolate chips, the remaining half cup of butter, and the 12 ounces of evaporated milk. Place the saucepan over low heat. Stir constantly, ensuring the butter melts and the chocolate chips gradually begin extract to melt into the evaporated milk. This process requires patience. We want to gently heat and stir until everything is melted and beautifully combined, forming a smooth, glossy chocolate sauce. Avoid high heat, as this can cause the chocolate to seize or burn. The evaporated milk provides a wonderfully creamy texture to the sauce.
Once the chocolate mixture is completely smooth and glossy, remove it from the heat. Now, we’ll add the powdered confectioner’s sugar. Gradually whisk in the 2 cups of powdered sugar, a little at a time, until it’s fully incorporated and the sauce has thickened slightly. It should be pourable but not too thin. Taste it! If you want it a little sweeter, you can add a touch more powdered sugar, but remember, it will be sweet from the chocolate and ice cream as well. Let this chocolate sauce cool for about 15-20 minutes, stirring occasionally. We don’t want it piping hot when we pour it over our frozen dessert, as it can melt the ice cream too quickly. It should still be warm enough to pour smoothly but not so hot that it causes damage.
The Grand Finnon-alcoholic ale: Assembly and Enjoyment
Once your ice cream and peanut layer is thoroughly frozen and firm (at least 2-3 hours, or ideally overnight), it’s time for the final assembly. Take the pan out of the freezer. Give your slightly cooled chocolate sauce a good stir. Pour the chocolate sauce evenly over the entire top of the frozen dessert, spreading it with a spatula to create a beautiful, unbroken chocolate shell. Work quickly but carefully here. The cold ice cream will help the chocolate set up.
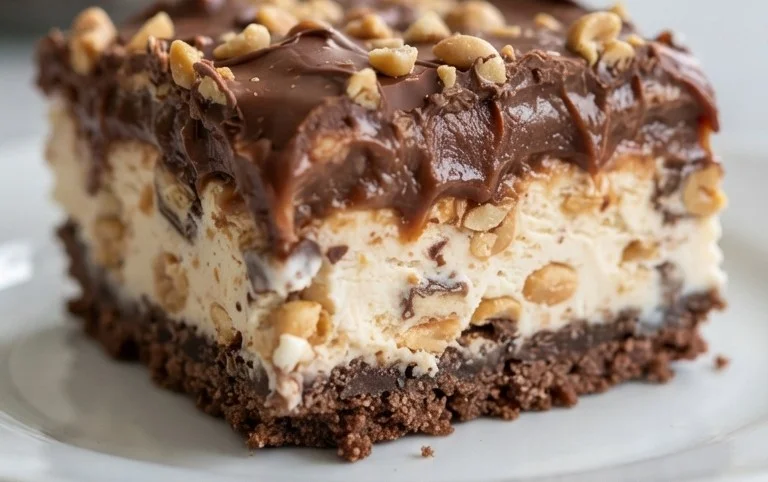
Immediately return the pan to the freezer for at least another 30 minutes to an hour, or until the chocolate topping is firm to the touch. This allows the chocolate to harden and create that satisfying crack when you slice into it. When you’re ready to serve, remove the pan from the freezer. If you lined it with parchment paper, you can lift the entire dessert out. If not, carefully cut it into squares directly in the pan. Let it sit at room temperature for just a minute or two before cutting to make it a little easier to slice through the frozen layers. Enjoy your homemade Buster Bar Ice Cream Dessert – it’s a true taste of nostalgia and pure deliciousness!
Conclusion:
And there you have it! This Buster Bar Ice Cream Dessert is truly a showstopper, combining the delightful crunch of peanuts and chocolate with a creamy, cool ice cream center. It’s incredibly satisfying to create this nostalgic treat in your own kitchen, and the taste is even better than you remember. Perfect for hot summer days, impromptu gatherings, or simply satisfying a sweet craving, this recipe is a guaranteed crowd-pleaser. I love serving it in thick slices, allowing everyone to experience that perfect balance of textures and flavors in every bite.
Feel free to get creative with variations! Consider swirling in some caramel sauce before freezing, or perhaps adding a layer of crushed Oreos for an extra chocolatey punch. You could even experiment with different ice cream flavors like mint chocolate chip or strawberry for a whole new experience. I truly encourage you to give this Buster Bar Ice Cream Dessert a try. It’s simpler than you might think and the delicious reward is absolutely worth it!
Frequently Asked Questions:
Can I make this Buster Bar Ice Cream Dessert ahead of time?
Absolutely! This dessert is perfect for making ahead. In fact, it’s best when frozen for at least 6-8 hours, or preferably overnight, to allow it to firm up properly. Once it’s fully frozen, you can keep it wrapped tightly in your freezer for up to a week. Just remember to let it sit at room temperature for about 5-10 minutes before slicing and serving for the best texture.
What if I don’t have a loaf pan?
No problem at all! You can use any freezer-safe container that’s roughly the same size as a standard loaf pan, like a rectangular casserole dish or even a sturdy cardboard box lined with parchment paper. The key is to have a uniform shape for easy slicing. Just ensure your chosen container is deep enough to accommodate all the layers.
Buster Bar Ice Cream Dessert
A delightful no-bake dessert featuring a cookie crust, creamy ice cream, and a rich chocolate peanut topping, inspired by the classic Buster Bar.
Ingredients
-
1 14.3 oz pkg. of Oreo cookies, crushed
-
1/2 C butter, melted
-
1/2 gal. vanilla ice cream, softened
-
1 lb. Spanish peanuts
-
2 C powdered confectioner’s sugar
-
12 oz semi sweet chocolate chips
-
1/2 C butter
-
12 oz evaporated milk
Instructions
-
Step 1
Combine the crushed Oreo cookies and 1/2 cup melted butter. Press this mixture firmly into the bottom of a 9×13 inch baking dish to form the crust. -
Step 2
Spread the softened vanilla ice cream evenly over the cookie crust. Place the dish in the freezer for at least 2-3 hours, or until the ice cream is firm. -
Step 3
While the ice cream is freezing, prepare the chocolate topping. In a saucepan over low heat, melt the 12 oz semi-sweet chocolate chips and 1/2 cup butter together, stirring constantly until smooth. -
Step 4
Stir in the 12 oz evaporated milk and 2 cups powdered confectioner’s sugar into the melted chocolate mixture. Continue to stir until the sugar is dissolved and the topping is smooth and glossy. -
Step 5
Remove the ice cream dessert from the freezer. Sprinkle the 1 lb. Spanish peanuts evenly over the top of the firm ice cream layer. -
Step 6
Pour the warm chocolate topping over the peanuts, ensuring an even coating. Return the dessert to the freezer for at least another 2-3 hours, or until the chocolate is set. -
Step 7
To serve, let the dessert sit at room temperature for a few minutes to slightly soften before cutting into bars or squares.
Important Information
Nutrition Facts (Per Serving)
It is important to consider this information as approximate and not to use it as definitive health advice.
Allergy Information
Please check ingredients for potential allergens and consult a health professional if in doubt.