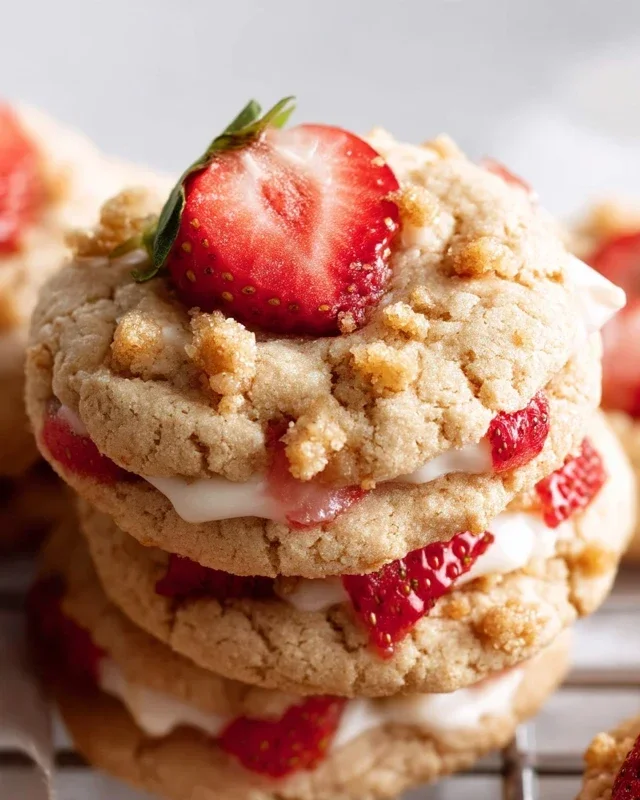
Strawberry Cheesecake Dessert Tacos – Sweet Treat
Strawberry Cheesecake Dessert Tacos are about to revolutionize your dessert game! Forget everything you thought you knew about tacos; these sweet sensations are a delightful departure from their savory cousins. Imagin extracte the creamy, dreamy indulgence of classic cheesecake, swirled with vibrant, fresh strawberries, all nestled within a crisp, golden taco shell. It’s pure, unadulterated joy in every bite, a perfect harmony of textures and flavors that has everyone swooning. We love them because they offer that beloved cheesecake experience without the fuss of a traditional pie, and the taco format makes them incredibly fun and portable for any gathering or even just a personal treat. What truly makes these Strawberry Cheesecake Dessert Tacos special is the ingenious combination – it’s familiar enough to be comforting, yet excitingly new and utterly irresistible.
Strawberry Cheesecake Dessert Tacos
Get ready for a dessert that’s as fun to make as it is to eat! These Strawberry Cheesecake Dessert Tacos are a delightful twist on classic flavors, combining the creamy richness of cheesecake with the portability and fun of a taco. We’re talking about warm, cinnamon-sugar coated shells cradling a luscious cream cheese filling, all topped off with a vibrant, sweet-tart strawberry compote. This recipe is perfect for a playful dessert night, a unique party treat, or when you just need a little something special to brighten your day. Forget the usual slice of cheesecake; let’s dive into something truly innovative and delicious!
Ingredients:
Preparing the Taco Shells
The foundation of our delicious dessert tacos lies in these crispy, cinnamon-sugar shells. It’s a simple process that yields incredibly satisfying results, transforming ordinary tortillas into a sweet, crunchy vessel.
Crafting the Creamy Cheesecake Filling
Now for the heart of our dessert taco – the luxuriously creamy cheesecake filling. This is where we capture that classic cheesecake flavor in a smooth, dreamy texture that perfectly complements the crispy shells.
Whipping Up the Strawberry Compote
To add a burst of fresh, fruity flavor and a beautiful color, we’ll create a simple yet delicious strawberry compote. This will be our vibrant topping that cuts through the richness of the cheesecake.
Assembling Your Dessert Tacos
The final, most exciting step is bringin extractg all these delicious components together to create your amazing Strawberry Cheesecake Dessert Tacos!
These Strawberry Cheesecake Dessert Tacos are a guaranteed crowd-pleaser. They offer a unique and fun way to enjoy the beloved flavors of strawberry cheesecake. I hope you have as much fun making and eating them as I do!
Conclusion:
And there you have it – your very own batch of delightful Strawberry Cheesecake Dessert Tacos! I truly believe this recipe is a winner because it masterfully blends the creamy, tangy goodness of cheesecake with the sweet burst of fresh strawberries, all nestled within a perfectly crisp taco shell. It’s an unexpected yet harmonious combination that’s guaranteed to impress, whether you’re serving it at a party or just treating yourself. The ease of preparation means you can whip up this incredible dessert taco experience without a fuss.
These dessert tacos are wonderfully versatile. Serve them as a light and refreshing end to a summer barbecue, or perhaps as a unique birthday treat that’s a step beyond the usual cake. They also make a fantastic addition to any potluck or dessert buffet, offering a fun and interactive element. Don’t hesitate to get creative with your toppings – a drizzle of chocolate sauce, a sprinkle of chopped nuts, or even a few mint leaves can elevate them further. The possibilities with these strawberry cheesecake dessert tacos are truly endless, so I encourage you all to give them a try and discover your favorite way to enjoy them!
Frequently Asked Questions:
Can I make the taco shells ahead of time?
Absolutely! You can prepare and bake the taco shells up to 2 days in advance. Store them in an airtight container at room temperature to maintain their crispness. Just fill them right before serving to prevent them from becoming soggy.
What if I don’t have fresh strawberries? Can I use frozen?
Yes, you can use frozen strawberries. Thaw them completely and drain off any excess liquid before mashing them with sugar. While fresh strawberries offer the brightest flavor, the frozen variety will still yield a delicious filling.
Are there any dairy-free options for this recipe?
Certainly! You can adapt this recipe to be dairy-free. Use a dairy-free cream cheese alternative and a dairy-free whipped topping. For the taco shells, many store-bought options are naturally dairy-free, but always check the ingredients to be sure.
Strawberry Cheesecake Dessert Tacos
A delightful dessert taco featuring a crispy cinnamon-sugar shell filled with creamy cheesecake filling and topped with a fresh strawberry sauce.
Ingredients
-
6 small flour tortillas
-
½ cup granulated sugar
-
1 tbsp ground cinnamon
-
½ cup unsalted butter, melted
-
8 oz cream cheese, softened
-
½ cup powdered sugar
-
1 tsp vanilla extract
-
½ cup heavy whipping cream
-
1 cup fresh or frozen strawberries, chopped
-
¼ cup granulated sugar
-
1 tbsp lemon juice
-
1 tbsp cornstarch mixed with 2 tbsp water
Instructions
-
Step 1
Preheat oven to 350°F (175°C). Lightly brush both sides of the tortillas with melted butter. In a small bowl, combine ½ cup granulated sugar and 1 tbsp ground cinnamon. Sprinkle this mixture evenly over both sides of the tortillas. -
Step 2
Drape the tortillas over the bars of your oven rack or over oven-safe molds, ensuring they hang like taco shells. Bake for 8-10 minutes, or until golden brown and crispy. Let cool completely on a wire rack. -
Step 3
In a medium bowl, beat the softened cream cheese with ½ cup powdered sugar and 1 tsp vanilla extract until smooth and creamy. -
Step 4
In a separate bowl, whip the heavy whipping cream until stiff peaks form. Gently fold the whipped cream into the cream cheese mixture. -
Step 5
In a small saucepan, combine the chopped strawberries, ¼ cup granulated sugar, and 1 tbsp lemon juice. Cook over medium heat until the strawberries soften, about 5 minutes. -
Step 6
Stir in the cornstarch slurry and cook, stirring constantly, until the sauce thickens, about 1-2 minutes. Remove from heat and let cool slightly. -
Step 7
To assemble, spoon the cheesecake filling into the cooled taco shells. Top with the strawberry sauce.
Important Information
Nutrition Facts (Per Serving)
It is important to consider this information as approximate and not to use it as definitive health advice.
Allergy Information
Please check ingredients for potential allergens and consult a health professional if in doubt.