Garlic Butter Keto Bread- Easy Low Carb Recipe
Garlic Butter Keto Bread is about to become your new obsession, and I’m not exaggerating! For anyone following a ketogenic lifestyle, the craving for a warm, crusty slice of bread can be incredibly persistent. I know I’ve been there! This recipe is a game-changer because it delivers all the satisfying texture and rich, savory flavor you miss, without the carb-heavy ingredients that send you out of ketosis. What makes this Garlic Butter Keto Bread so incredibly special is its perfect balance of ingredients, resulting in a tender interior and a delightful, subtly crisp exterior, all infused with that irresistible aroma of garlic and butter. It’s surprisingly easy to whip up, proving that delicious, guilt-free indulgence is absolutely achievable. Prepare yourself for a truly delightful experience!
Why You’ll Love This Recipe
A Keto Dream Come True
No more feeling deprived! This Garlic Butter Keto Bread satisfies those bread cravings like nothing else. It’s a versatile masterpiece that pairs perfectly with your favorite keto soups, stews, or as a standalone treat. The aroma alone will have you hooked!
Garlic Butter Keto Bread
Welcome, fellow keto enthusiasts! Today, we’re diving into a recipe that has become an absolute staple in my kitchen: Garlic Butter Keto Bread. If you’ve been missing the comforting, savory aroma and delicious chew of freshly baked bread on your low-carb journey, this is your answer. This bread is incredibly versatile, perfect for slathering with butter, dipping into soups, or even making mini grilled cheese sandwiches. It’s surprisingly easy to make, and the flavor payoff is immense. Get ready to impress yourself (and anyone lucky enough to share it with you!).
Ingredients:
Let’s talk about these ingredients for a moment. The blanched almond flour is our base, providing that classic bread-like texture without the carbs. Psyllium husk powder is crucial for binding and creating that soft, slightly chewy interior. Make sure you’re using the powder, not the whole husks, as they behave differently. Baking powder is our leavening agent, giving our bread a nice lift. Salt, of course, enhances all the flavors. Melted butter adds richness and helps with browning. Room temperature eggs are important for a better emulsion in the batter. Warm water activates the psyllium husk and helps create a cohesive dough. Apple cider vinegar reacts with the baking powder to give an extra boost of leavening and also helps tenderize the crum extractb. Finally, minced garlic and fresh parsley are where the magic happens for our garlic butter flavor – pure deliciousness!
Cooking Instructions
Now, let’s get baking! This recipe comes together quite quickly, so preheating your oven and preparing your baking pan should be your first steps.
1. Prepare Your Baking Vessel and Preheat the Oven: Begin extract by preheating your oven to 350°F (175°C). This is a moderate temperature that allows the bread to bake through without burning the exterior. Next, prepare your baking pan. I find a standard 8×4 inch loaf pan works wonderfully. You can either generously grease the pan with butter or a keto-friendly oil, or line it with parchment paper, leaving some overhang on the sides to make it easy to lift the bread out later. A well-greased or lined pan prevents sticking, which is always a win!
2. Combine Dry Ingredients: In a large mixing bowl, whisk together the blanched almond flour, psyllium husk powder, baking powder, and salt. It’s really important to ensure these are thoroughly combined to distribute the leavening and prevent pockets of unincorporated ingredients. Give it a good whisk until everything looks uniform. This step ensures even texture and rise in your final bread.
3. Combine Wet Ingredients and Form the Dough: In a separate medium bowl, whisk together the melted butter, eggs, warm water, and apple cider vinegar until well combined. You’ll notice the mixture might look a little frothy, which is perfectly normal. Now, pour the wet ingredients into the bowl with the dry ingredients. Using a sturdy spatula or a wooden spoon, mix everything together until a thick, cohesive dough forms. Don’t overmix, but ensure there are no dry pockets of flour or psyllium husk. The dough will be quite sticky, which is exactly what we’re looking for.
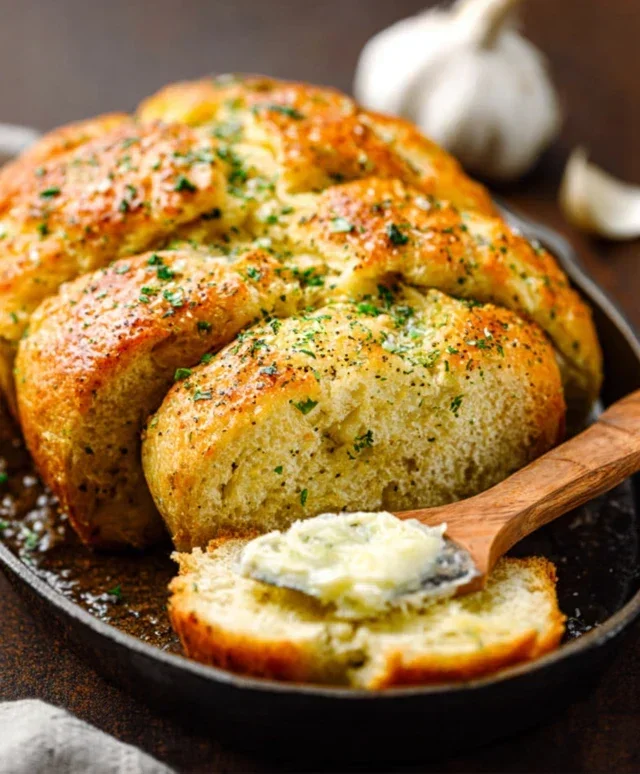
4. Incorporate Garlic and Shape the Loaf: Now for that incredible garlic flavor! Add the minced garlic to the dough. I like to fold it in gently, ensuring it’s distributed throughout. If you’re using fresh parsley, add about half of it now and save the rest for the topping. Lightly wet your hands with a little water or oil to prevent sticking, and then shape the dough into a rough loaf shape within your prepared pan. You don’t need to knead it like traditional bread; just gently press it into an even layer. Think of it as coaxing the dough into its final form.
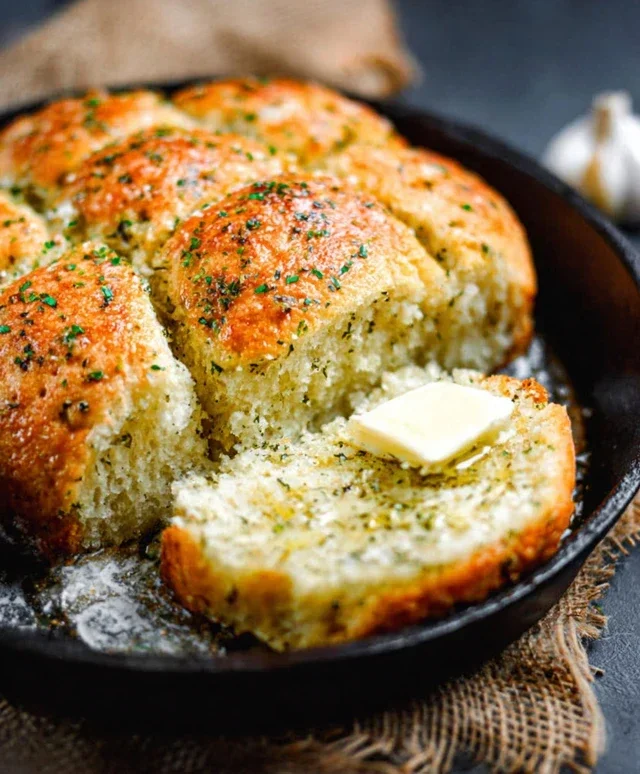
5. Apply the Garlic Butter Topping and Bake: This is where we elevate our bread from delicious to irresistible! In a small bowl, melt a little extra butter and stir in your minced garlic and any remaining fresh parsley. Generously brush this glorious garlic butter mixture all over the top of the loaf. This not only infuses the bread with even more garlic flavor but also creates a beautiful, golden-brown crust as it bakes. Place the pan in your preheated oven and bake for 40-50 minutes, or until the bread is golden brown, firm to the touch, and a toothpick inserted into the center comes out clean. The aroma that will fill your kitchen during this time is heavenly!
6. Cooling and Slicing: Once baked, carefully remove the loaf pan from the oven. Let the bread cool in the pan for about 10-15 minutes. This initial cooling period is important to allow the structure to set properly. Then, using the parchment paper overhang or by carefully inverting the pan onto a wire rack, remove the bread from the pan and let it cool completely on the wire rack. I know it’s tempting to slice into it immediately, but allowing it to cool completely ensures clean slices and prevents a gummy interior. Once fully cooled, slice with a serrated knife and enjoy. This bread is fantastic warm or at room temperature, and it stores well in an airtight container for a few days.
Enjoy every delicious, low-carb bite of your homemade Garlic Butter Keto Bread!
Conclusion:
I hope you’re as excited as I am to dive into this delicious Garlic Butter Keto Bread recipe! This recipe truly is a game-changer for anyone following a ketogenic lifestyle. It delivers all the comforting, satisfying flavor of traditional bread without the carb count. The golden brown crust, the soft, airy interior, and that irresistible garlic butter aroma make it perfect for any occasion. Whether you’re craving a side for your favorite keto meal, a base for an open-faced sandwich, or simply a tasty snack, this bread delivers. Don’t hesitate to give it a try – you won’t be disappointed!
I love serving this Garlic Butter Keto Bread warm, right out of the oven, with a side of scrambled eggs for breakfast, alongside a hearty stew for dinner, or even just to dip into some olive oil. For variations, consider adding a sprinkle of fresh chives or parsley to the garlic butter topping for an extra pop of flavor and color. You could also experiment with a touch of parmesan cheese mixed into the topping for a cheesy twist.
Frequently Asked Questions:
Q: Can I freeze this keto bread?
A: Absolutely! Once completely cooled, you can slice the bread and freeze individual slices in an airtight container or freezer bag. Reheat gently in a toaster or oven for a quick and easy keto bread fix.
Q: What can I use instead of almond flour?
A: While almond flour is my preferred choice for its texture and flavor in this recipe, you could experiment with coconut flour. However, coconut flour is much more absorbent, so you’ll likely need to adjust the liquid quantities significantly. It’s best to stick with almond flour for the most reliable results with this specific recipe.
Q: How long does this bread stay fresh?
A: Stored in an airtight container at room temperature, this keto bread will typically stay fresh for 2-3 days. For longer storage, refrigeration is recommended, which can extend its freshness for up to a week. Remember that refrigeration can slightly alter the texture, so toasting is often best.
Garlic Butter Keto Bread
A delicious and easy keto-friendly bread recipe infused with garlic and butter, perfect for low-carb diets.
Ingredients
-
1 cup almond flour
-
1/2 cup coconut flour
-
1/4 cup psyllium husk powder
-
2 teaspoons baking powder
-
1/2 teaspoon salt
-
4 large eggs
-
1/2 cup melted butter, plus more for brushing
-
1/4 cup water
-
2 cloves garlic, minced
-
1 tablespoon chopped fresh parsley
Instructions
-
Step 1
Preheat oven to 350°F (175°C). Grease and line a small loaf pan with parchment paper. -
Step 2
In a large bowl, whisk together almond flour, coconut flour, psyllium husk powder, baking powder, and salt. -
Step 3
In a separate bowl, whisk together eggs, melted butter, and water. -
Step 4
Pour the wet ingredients into the dry ingredients and mix until a dough forms. -
Step 5
Stir in the minced garlic and chopped parsley. -
Step 6
Transfer the dough to the prepared loaf pan and shape the top into a loaf. -
Step 7
Bake for 35-45 minutes, or until a toothpick inserted into the center comes out clean. -
Step 8
Let cool in the pan for 10 minutes, then transfer to a wire rack to cool completely. Brush with melted butter before slicing.
Important Information
Nutrition Facts (Per Serving)
It is important to consider this information as approximate and not to use it as definitive health advice.
Allergy Information
Please check ingredients for potential allergens and consult a health professional if in doubt.